plan - Calendar and Day Planner
All pictures below have been reduced to one-half size and compressed with fairly brutal quality settings.
Contents
- Introduction and calendar views
- Definition of appointments
- Using files to group appointments
- Networking with the netplan IP server
- Configuration options and holiday definitions
Calendar Views
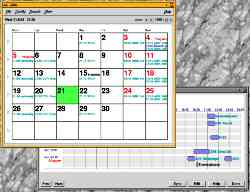
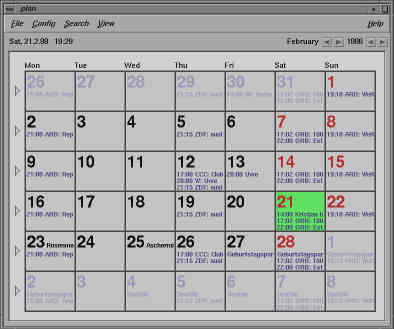
plan supports five different view modes:- plan comes up with the month view, which shows up to 31
day boxes, each with up to three (depending on the X resources)
appointments in small script. Each appointment is shown with a
time (if there is one) and a short ``note'' text (also optional).
The current date is shaded green. There is also a small version
of this view that does not have room for appointments but does
not take up as much screen real estate.
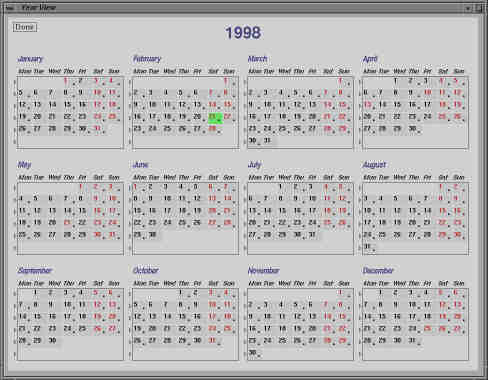
- The year view consists of 12 month views arranged on a 3*4 grid.
Appointments are not listed, but if there is one on a day, a dot
appears in the day box.
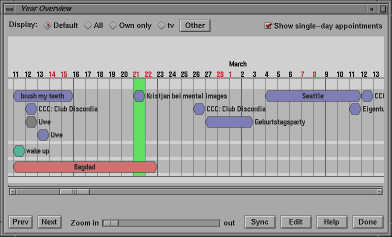
- The year overview shows all days of a year in 365/366 day columns.
Appointments are shown as horizontal bars that can cover multiple
days if the appointment is defined to cover several days. This
view is especially useful for multiday events such as vacations
and trade shows. I use this view most of the time.
- The week view shows one week (actually up to 28 days, this is
configurable) with one row per day, divided horizontally in hour
columns. Appointments are shown as horizontal bars that extend
from the appointment's start time to its end time.
- The day view shows one week with one column per day, divided vertically into hour columns. Appointments are wide vertical bars. This is essentially a rotated week view; it corresponds to familiar paper planners.
Each view has active areas that, when pressed, switch to another view. For example, pressing on a day in the month calendar number switches to a day view. There is also a pulldown menu, and keyboard accelerators (Ctrl-M, Ctrl-Y, Ctrl-O, Ctrl-W, and Ctrl-D). Other views can either use the main window, or pop up their own windows (this is a configuration option).
The following paragraphs describe each view in turn. The next chapter defines what an appointment is, what it can do, and when it causes actions such as popping up reminder windows or executing sacripts. Finally, configuration options are discussed.
Month View
Pulldown Menus
- File
- File list installs a popup that lists the files and network servers where appointments are stored.
- Reread appointments is useful for recovery after a network connection went down.
- Delete past entries deletes appointments in the past.
- Print prints PostScript calendars.
- About pops up a menu with the current version, credits, and web page and mailing list information.
- Quit saves any unsaved data and exits plan.
- Config
- Calendar views is for general preferences, see below.
- Adjust time allows adjusting the current time and daylight saving information.
- Alarm options defines what happens when an appointment time or advance-warning time is reached: pop up a reminder window, send mail, or execute a script (that play an audio file, for example).
- Define holidays allows the definition of holidays.
- Search pops up an appointment edit menu
containing a list of appointments.
- Today: all appointments today.
- Tomorrow: all appointments tomorrow.
- This week: all appointments this week.
- Next week: all appointments next week.
- This month: all appointments this month.
- All: all appointments.
- Private: all private appointments (see below).
- One file: all appointments in a given file ( see below).
- Search keywords: all appointments whose note or message text contain the given keywords.
- View switches to the specified view.
- Day
- Week
- Small month
- Large month
- Year
- Year Overview
- Goto today jumps to today's date.
- Goto jumps to an arbitrary entered date. (Note that plan only works in the Unix eon, 1970..2038.)
- Help pops up help browsers on various topics.
- On context
- Introduction
- Getting help
- Troubleshooting
- Files and programs
- Networking
- Database access
- X resources
Buttons
- Previous/next month
- Previous/next year
Active zones
- Day number: call a day view beginning with this day
- Triangle at the left edge: call a week view
- Left third of an appointment: drag&drop to another start date
- Right two thirds of an appointment: call an appointment edit menu
- Empty space below appointments: call an appointment edit menu
Year View
Buttons
- Done: remove view or return to the month view
Active zones
- Upper left of a day box: call a day view
- Lower right of a day box: call an appointment edit menu
- Triangle at the left edge: call a week view
- Month name: call a month view
Year Overview
Buttons
- Display default: display all files selected in the file list
- Display all: display all files
- Display own only: display own appointments, no other files
- Display other: display a specific file, press the button to select
- Show single-day appointments: turn off to unclutter the display
- Prev/next year
- Zoom in/out: expand/condense the chart
- Sync: reread all non-network files (this is largely obsolete)
- Edit: edit all appointments in the displayed year
- Help: call help browser
- Done: remove view or return to the month view
Active zones
- Left third of an appointment: drag&drop to another start date
- Middle third of an appointment: call an appointment edit menu
- Right third of an appointment: drag&drop length to another end date
- Empty space: call an appointment edit menu
Week View

Buttons
- Prev/next week
- Sync: reread all non-network files (this is largely obsolete)
- Edit: edit all appointments in the displayed year
- Help: call help browser
- Done: remove view or return to the month view
Active zones
- Left third of an appointment: drag&drop to another start time or date
- Middle third of an appointment: call an appointment edit menu
- Right third of an appointment: drag&drop length to another end time
- Empty space: call an appointment edit menu
Day View
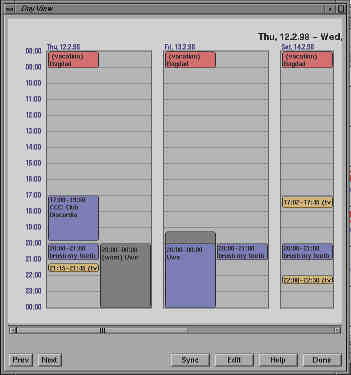
Buttons
- Prev/next day
- Sync: reread all non-network files (this is largely obsolete)
- Edit: edit all appointments in the displayed year
- Help: call help browser
- Done: remove view or return to the month view
Active zones
- Top third of an appointment: drag&drop to another start time or date
- Middle third of an appointment: call an appointment edit menu
- Bottom third of an appointment: drag&drop length to another end time
- Empty space: call an appointment edit menu
Appointments
Appointments are entered, changed, and deleted with the edit menu: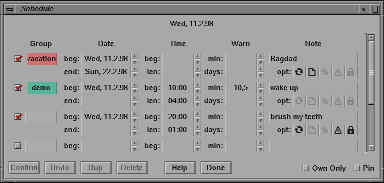
Buttons
- Confirm: stop editing an appointment and put it in the database. Pressing the Return key when editing the Note field has the same effect.
- Undo: when pressed instead of Confirm, the changes are undone.
- Dup: make a copy of the current appointment. First press any field of the appointment to be copied to select it.
- Delete: delete the current appointment. First press any field of the appointment to be deleted to select it.
- Help: call help browser
- Done: remove the popup
- Own Only: only shown own appointments, not appointments from other files).
- Pin: normally, editing another appointment re-uses the current edit menu. Pinned edit menus stay around, and if a different one is needed another popup menu is created.
Mandatory properties
- Enable/disable: Disabled appointments show up grayed-out in views but never do anything.
- File: the file in which the appointment is stored
- Begin date: the date where the appointment becomes active. If it does not repeat, this is the appointment trigger date.
- Begin time: either the trigger time of day, or a ``-'' sign (meaning that the appointment has no time, such as a vacation)
- Note (not really mandatory but recommended): the text shown in the various views
Optional properties
- End date: the last date of the appointment. The appointment appears on every date from the begin date to the end date, unless the recycle menu specifies otherwise.
- Length: the length of the appointment in hours:minutes, up to the end of the day.
- Advance warning, minutes: one or two comma-separated numbers of minutes, and an optional comma-separated minus to keep the appointment from triggering at its specified time. Advance warning means that a warning reminder appears the given number(s) of minutes before the specified time.
- Advance warning, days: a reminder appears this many days ahead, at the specified time..
- Circular icon: Recycling information (see below)
- Page icon: Extended multiline message (see below)
- Percent icon: Multiline shell script
- Triangular icon: Exception dates and options (see below)
- Padlock icon: padlocked appointments go into a special private file in the home directory (.dayplan.priv) that no other user can access.
Recycle popup menu
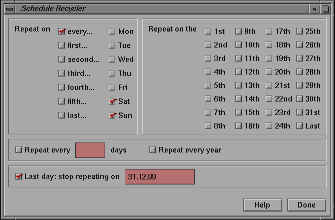
- Repeat on given weekdays
- Repeat on given days of the month
- Repeat every n days
- Repeat yearly
- Help: pop up help browser for this popup
- Done: remove the popup
If more than one of these is specified, the appointment repeats on all of the specified days. Using an end date in the main edit menu without using the recycle popup is equivalent to repeating every 1 days until some end date.
If an appointment repeats, instances of the appointment show up on multiple days, the appointment is not copied to all these dates. Editing any of these edits the appointment. Note that dragging an appointment in one of the views does not change repetition information - if it repeats every Monday and is dragged forward one day, it still repeats on Mondays but begins one Monday later.
Message popup menu
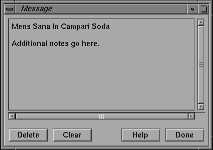
- Text area: type text here. The text will appear in reminders when the appointment reaches a trigger or advance-warning date and time.
- Delete: delete the message
- Clear: clear the text area
- Help: pop up help browser for this popup
- Done: remove the popup
The same popup is installed for the ``%'' icon. It can be used to enter a shell script that is executed at appointment trigger time (but not advance-warning times). Shell scripts should begin with a #! line.
Exception popup menu
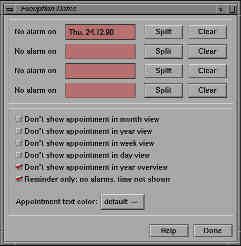
- No alarm on: allows entry of dates where the repeating appointment should not trigger. (If it doesn't repeat, exception dates make no sense.)
- Split: if an exception date exists, create a fill-in appointment for that day. This can be used to change an instance of an appointment (remember, instances are all identical, changing one changes all).
- Clear: delete the exception date (but do not delete the fill-in] appointment, if any).
- Don't show appointment in month view
- Don't show appointment in year view
- Don't show appointment in week view
- Don't show appointment in day view
- Don't show appointment in year overview
- Reminder only, no alarms, time not shown: this is equivalent to entering a ``-'' sign into the time field of the appointment edit menu. Useful for time-less appointments such as vacations.
- Appointment text color: select one of eight foreground colors for the appointment text (the background color can be set to indicate the file the appointment is from, see Configuration).
- Help: pop up help browser for this popup
- Done: remove the popup
The same popup is installed for the ``%'' icon. It can be used to enter a shell script that is executed at appointment trigger time (but not advance-warning times). Shell scripts should begin with a #! line.
Files
Appointments are stored in files, either on a reachable disk or on a netplan IP server. Grouping appointments in files allows specification of which appointments are shown in which views, and using colored backgrounds in views. Also, if multiple users access files, it is possible to grant read/write access to individual users (in this case you should definitely use netplan to properly sequence multiple concurrent accesses).Files can be specified from a menu called from the File list choice in the File pulldown in the main window:

The first line in the list is the user's ``own'' file, stored either in the .dayplan file in your home directory or under your login name on a netplan IP server. The group and local file name cannot be edited. The name can be edited, but should always be your login name. This makes it easy for other users to find your appointment file if it is stored on a netplan IP server. (Use the padlock flag in the edit menu to make ``own'' appointments inaccessible to others.)
- Month checkmark: appointments from this file are shown in month views.
- Week checkmark: appointments from this file are shown in week views.
- Day checkmark: appointments from this file are shown in day views.
- YrOv checkmark: appointments from this file are shown in year overviews.
- Alarm checkmark: appointments from this file trigger alarms.
- Group: specifies the background color of appointments in various views and in the File column in the edit menu.
- Name: a short, descriptive, unique name of the file. This is the name the file is stored under on the netplan IP server, if enabled, and it is the name that shows up in edit menus.
- Server checkmark: if off, the file is stored in a file; if on, it is stored on a netplan IP server. Always use a server if a file is accessed by more than one user.
- Local path: if the Server checkmark is off, enter the file name here.
- Server host: if the Server checkmark is on, enter the name of the host where the netplan IP server runs.
- Delete: delete the current file in the list. The file on disk or on the server is not deleted, you just won't see it any longer. First press any field of the file row to be deleted to select it.
- Sort: sort the file rows by name.
- Cancel: forget all changes to the file list and remove the menu.
- Help: pop up help browser for this menu.
- Done: commit the changes and remove the menu.
Networking with the netplan IP server
The problem with storing files in plain disk files is that plan basically acts as a text editor, and when two text editors access the same file, two problems exist: changes made by one user do not become visible to the second user, and if both users make changes and write back (plan writes back ten seconds after a change) only the last write will succeed and the first is overwritten.The netplan IP server solves this problem. It is typically started on a single host on the local network, and manages appointment files. Any number of plan programs can connect to it. netplan sequences all updates to the same appointment so that no two users can edit an appointment simultaneously. It also broadcasts changes to all connected plan programs that have the file in their file lists. All plans then update all their views to reflect the change. netplan supports access lists to limit read, write, and delete access to files based on user, group, and host names, and supports mandatory identd RFC 1413 authentication where available. See the documentation for details.
Configuration
All configuration menus are called from the Config pulldown.Config->Calendar Views
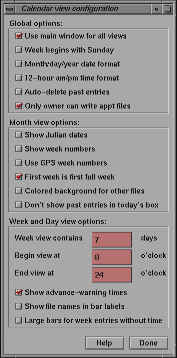
- Global options
- Use main window for all views: when switching views, put the new view into the main window instead of creating a new one.
- Week begins with Sunday: this is for U.S. users. Normally the week begins with Monday.
- Month/day/year format: this, too. Day.month.year is the default.
- 12-hour am/pm format: and this. 24-hour mode is the default.
- Auto-delete past entries
- Only owner can write appt files: this is largely obsolete, use netplan if you have multiple users.
- Month view options
- Show Julian dates: Julian dates count from 1 to 365 or 266.
- Show week numbers: week numbers count from 1 to 52. Both Julian dates and week numbers are displayed only if the day number font is at least twice as tall as the small note font.
- Use GPS week numbers: GPS is the Global Positioning System, which counts week in the range 0..1023 and then starts over.
- First week is first full week: controls week number counting; week 1 is the first week that has all seven days in the current year. By default, week 1 is the week that has at least one day in the current year. Most people enable this.
- Colored backgrounds for other files: use the color defined for the file in the file list menu as the background. All other views always do this, but it tends to look too gaudy in the month view.
- Don't show past entries in today's box: usually month view day boxes have room for only three appointments. Normally the first three are shown. If this option is enabled, the next three are shown.
- Week and Day view options
- Week view contains n days: normally these views show seven days, but 1..28 days are possible.
- Begin view at n o'clock: the time at the left edge of week views and the top edge of day views.
- End view at n o'clock: the time at the right edge of week views and the bottom edge of day views.
- Show advance-warning times: Advance warnings are shows as gray extensions of the appointment bar.
- Large bars for week entries without time: appointments with ``-'' in the time field in the edit menu extend all the way from the begin and end times. Normally they are shown as small triangles at the begin edge.
- Help: pop up help browser for this menu.
- Done: remove the menu.
Config->Adjust time
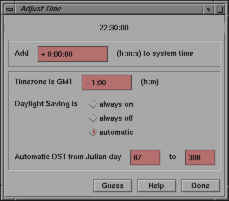
- Add +-h:m:s to system time: a correction offset for systems that have an incorrect system time that you cannot correct
- Timezone is GMT +-h:m: enter your local timezone. -1:00 is standard European time, +5:00 is EST, +8:00 is PST.
- Daylight Saving is always on/always off/automatic
- Automatic DST from Julian dat n to m: switch dates if Daylight Saving is automatic
- Guess: get DST setup from system. This is usually wrong.
- Help: pop up help browser for this menu.
- Done: remove the menu.
Config->Alarm options
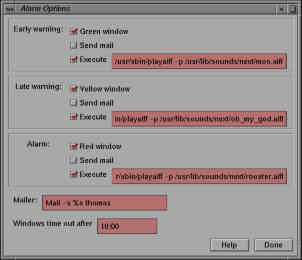
- Early warning: what happens at early advance-warning times
- Green window: post a green reminder popup
- Send mail: send a mail message using the Mailer command below
- Execute command: run this shell command, usually some audio player
- Late warning: what happens at late advance-warning times. Same thing as above, except that the reminder popup is yellow.
- Alarm: what happens at trigger times. Same thing as above, except that the reminder popup is red.
- Mailer: the command to run to send mail. The string ``%s'' is replaced with an appropriate subject string.
- Windows time out after h:m: the maximum lifetime of a green, yellow, or red reminder windows. This avoids a process table full of reminders when you return from a long vacation.
- Help: pop up help browser for this menu.
- Done: remove the menu.

- text area: the note string of the appointment, plus the message string if there is one, as defined in the edit menu.
- Snooze 5 min: disappear and pop up again in five minutes.
- Dismiss: disappear and don't come back. The appointment database is not changed.
Config->Define holidays
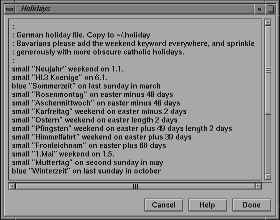
- text area: enter holiday expressions here. Later ones override earlier ones.
- Help: pop up help browser for this menu.
- Done: remove the menu.
    small "New Year" weekend on 1/1
    small "President's Day" weekend on third monday in february
    small "Easter" weekend on easter
    small "Memorial Day" weekend on last monday in may
    small "Independence Day" weekend on july 4
    small "Labor Day" weekend on first monday in september
    small "Columbus Day" weekend on second monday in october
    small "Veteran's Day" weekend on november 11
    small "Thanksgiving" weekend on fourth thursday in november
    small "Christmas" weekend on december 25
    "Spring Begins" on march 22
    "Summer Begins" on june 22
    "Fall Begins" on september 22
    "Winter Begins" on december 22
Back to the main plan page.